Whenever a new Pokémon game is announced, it always draws the attention of Pokémon lovers. The first Pokémon team MOBA game, created by TiMi Studios and the Pokémon Company, was first released on the Nintendo Switch back in July 21.
Pokémon Unite is free to download on the Nintendo eShop. You can play with multiplayers online and don’t even need a Nintendo Switch Online subscription! It has all the trappings of popular MOBA games like League of Legends and SMITE. To help you get started, I’ve created a list of the settings and controls you should have enabled when you first boot up the game.
Pokémon Unite Best Setting Guide and Explanation
Going into the settings is pretty easy. Boot up the game and click the “X” button to pull up the sidebar. From there, go down and navigate to the ‘settings’. This will bring up a whole heap of settings you’re able to alter and customize.

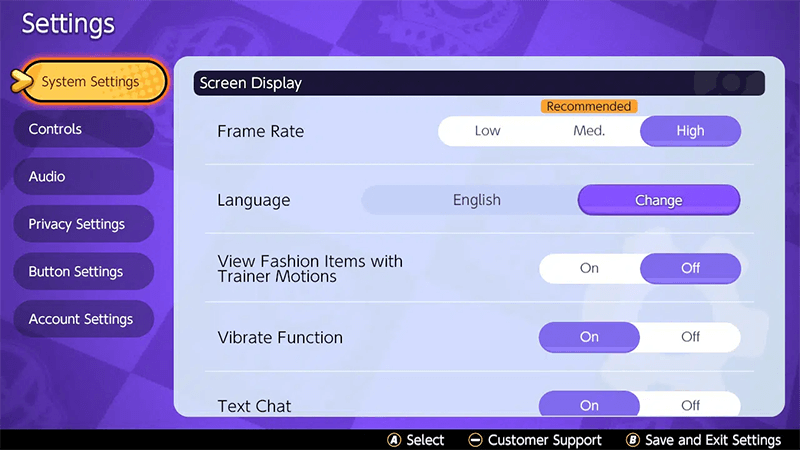
System Setting Explain
- Frame Rate: High
Choosing Low or Medium locks the game speed to a steady 30 FPS, while choosing high targets 60 FPS. Although the high option sometimes dips in performance when fights get too cluttered, we still recommend that you set the game’s frame rate to the highest setting to get the smoothest gameplay as possible. The higher the frame rate, the more responsive your inputs are.
- Language
Currently, Pokémon Unite is available in English, Japanese, Korean, and Chinese (Simplified/Traditional) languages.
- View Fashion Items with Trainer Motions: Off
It’s basically when you’re in the game, your trainer shows up capturing stuff. If you turn this on, it’ll have your chosen clothes instead of a default trainer costume.
- Vibrate Function: Off
If you don’t play games with vibrations, you can turn it off. I will suggest to have them off as it is kind of messes you up at the beginning.
- Text Chat: Off
It doesn’t support to “Text Chat” in Game on Nintendo Switch.
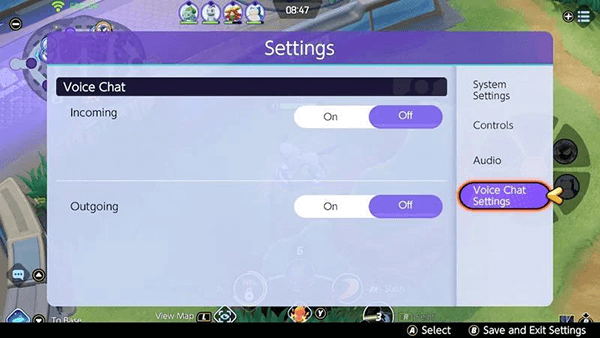
- Voice Chat: On
Voice chat is turned on by default. You can also adjust your voice volume, set it to low or high depending on your mic sensitivity.
Now just because you have this voice setting turned on doesn’t mean you can just plug in a headset and start chatting with your teammates. There is actually two more settings that you have to turn on.
Within a game match, you press + button on Joy-Con, then you press – button to enter ‘SETTING’ .
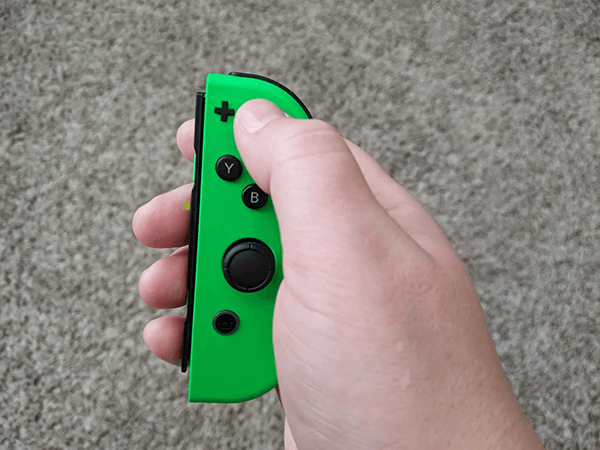
And then you go all the way down to Voice chat setting. Then you see “Incoming” and “Outgoing”.
‘Incoming’ control if you can hear voice from your teammates.
‘Outcoming’ control if your teammates can hear you.
- Colorblind Support
The default is “Off”. Press the “A” button to turn it on/off.
Best Control Setting Explain
- Opponent Lock-on Priority: Lowest Remaining HP (Value)
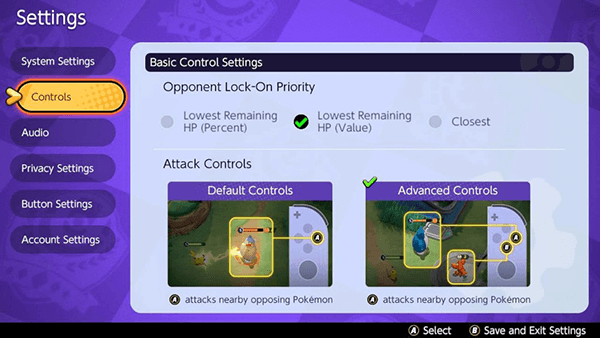
Do you want to Lock onto the enemies Pokémon with “Lowest Remaining HP %”, “Lowest Remaining HP Value”, or “Closest Range”?
The default is to lock on “Low HP %”. I’m choosing the lowest value because I feel like a percentage is not right. A Pokémon that has a super high hp vs. a Pokémon that has a super low hp, it could be a little deceptive. So I would rather to lock on the lowest remaining HP value for now.
- Attack Controls: Advanced
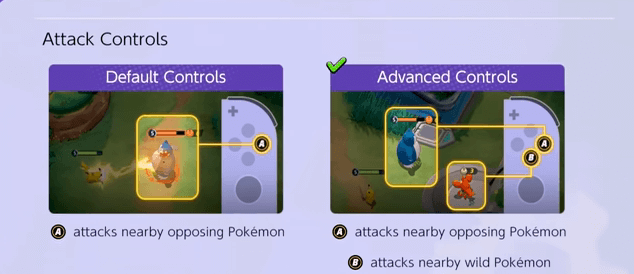
By choosing the Advanced Controls option, the ‘A‘ button can be used target opponents and the ‘B‘ button to focus on attacking Wild Pokemon. You will get in the habit of kind of differentiating the ‘A‘ & ‘B‘ button. Once you get used to it, it’s going to make your gameplay much improved.
- Automatic Basic Attacks: On
It’s On by default. What this does is, if you do one basic attack onto the enemy or wild Pokemon, it will keeps auto attacking. It doesn’t really matter because most people are bashing their attack buttons anyway.
Turning this On for beginner, You will be able to quickly start the game and be familiar with Pokémon’s basic attack and extra effect. It makes the game easier.
Turning this Off for Pros, you want full control to your Pokémon’s attack, like Boosted attack,
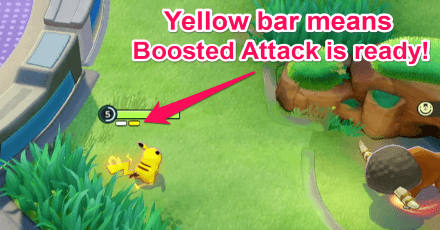
- Boosted Attack Gauge: On
Each Pokémon’s Basic Attack turns into a Boosted Attack after a certain number of attacks. The Boosted Attack gauge allows you to visually see what number attack you are on.
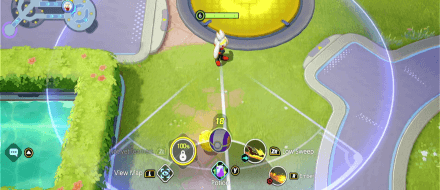
- Lock-On Icon: On
This option must be On. It will add an extra menu wheel on your screen where you can target a nearby opponent by tilting the right joystick to their icon. Choosing your target this way will make your Pokémon move to the opponent’s position and attack it automatically.
- In-Motion Pursuit Distance: Standard
The distance tells you how far it’ll automatically move your character on a target-attack enemy from.
- In-Motion Pursuit Mode: On for Beginner
If turning this On, when you press attack button “A” or “B”, it will automatically move your character into range to attacks. It doesn’t matter for melee character. But for ranged characters, you need to control your movement to kite and this setting is matter.
- Scoring Controls: Press Button
The default scoring method makes you hold down the X until the Aeos Energy meter charges up. We recommend choosing Press Button as it frees your thumb to press any other button when needed. It also prevents moments where your thumb slips from holding down the button, causing you to charge again.
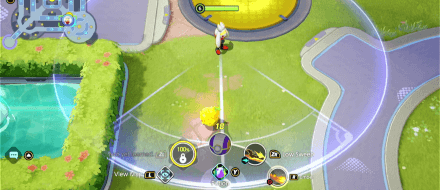
- Camera Follows Moves: On
Turning on Camera Follows Moves lets you extend the range view when targeting off screen. This gives you a bit more information on where your move will hit. If you want to pan the camera manually, you can hold down L button and move with the right Joystick.
- Move Aim Follows Movement Direction: On for Beginner
When turned on, you can aim your move in the direction of where your Pokémon is facing, so you don’t have to specify the direction of the move with the joystick even while you are moving. This is extremely useful when you want to use your Pokémon’s Dash moves to get out of dangerous situations instead of using it for offense. You can still move aim by the right joystick
- Move Aim Snaps to Nearby Targets: On for Beginner
Turning on Move Aim Snaps to Nearby Targets will make your moves target a nearby enemy automatically. This allows you to use your moves while not worrying to much on targeting! You can still move aim by the right joystick.
- Minimap Position: Top Left of Screen
Generally, you can pick whatever minimap position you like. However, if you have the Lock-On Icon setting turned on, we recommend leaving the default at the top left of the screen. When the aiming icon is turned on, the map is displayed below the aiming icon, making the right side a little harder to see.
- Move Learning Controls: Single Button
Of course single button. Button Combination will just take unnecessary time and doesn’t see any benefit.
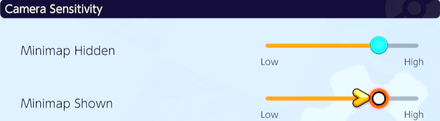
- Camera Sensitivity: Higher
By default, the camera sensitivity is set relatively low. We recommend adjusting the value high as possible so you can quickly gauge the surroundings and assess the entire map more quickly.
- Aim Assist Settings: Off
Now, there’s one last really important option here. It’s going to mainly affect AOE abilities.
Smart Assist lets you ‘snap’ to targets when your aim is close to them. so you can quickly attack.
Sensitivity Assist makes your aim slow move as it approaches the target. This prevents your aim to accidentally go passed the target, which can help you line up your shots perfectly!
I have the Assist Off.
when the opponents are in team fights, I want to hit multiple enemies with AOE abilities. If you turn it on smart aim assistance, the Smart Assist will auto target at an opponent, I can’t quickly hit both opponents. I want to move my aim freely. So, I turn Assist Off.
It will be a little bit up to preference because if you’re just a casual player, you might want to leave the setting on. But if you are trying to really propel your gameplay to the next level then i really think you should turn it off as soon as possible.
I will suggest to use Smart Assist for beginner, and turn Assist Off for pros.
Button Setting Explain
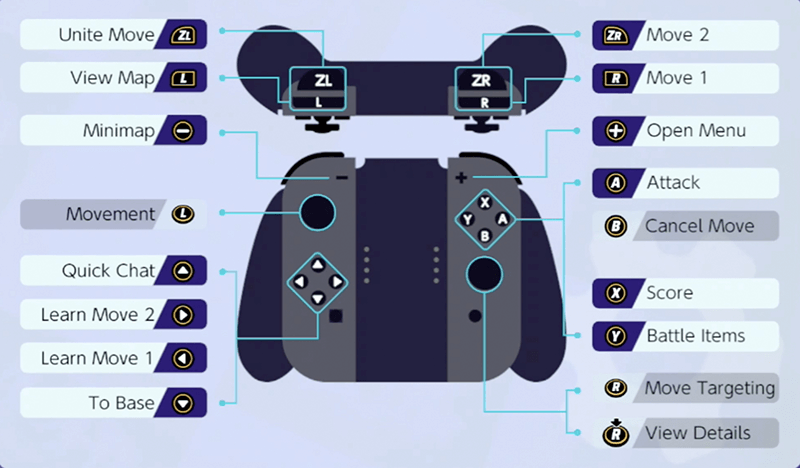
| Switch Controls | Action |
| ZL | special move 2 |
| ZR | special move 2 |
| L | view map |
| R | special move 1 |
| – | mini-map |
| + | open menu |
| Left Joystick | Pokémon movement |
| Up | quick chat |
| Right | learn move 2 |
| Left | learn move 1 |
| Down | teleport to base |
| A | attack opponent Pokémon |
| B | attack wild Pokémon |
| X | score |
| Y | battle Items |
| Right Joystick | change target opponent, or skill target |
How to Play Pokémon Unite at 60 FPS in Handheld Mode?
By default, Pokémon Unite runs at 30 FPS in handheld mode, and 60 FPS in docked mode. TiMi Studios drops it down to 30 FPS when players are in handheld mode. This is because the Switch device actually has a lower-clocked CPU when played portable. Thankfully, Pokémon Unite gives options for players who want their game to run at a smooth 60 FPS at all times can enable it by following these steps:
- Step 1: Press “X” on the home screen and select “Settings”.
- Step 2: Scroll to System Settings and change “Frame Rate” to High.
- Step 3: A Pop-up will appear to warn the player that this is not recommended, press “Confirm” to set the Frame Rate to High.
- Step 4: Press “B” to go back, and confirm the settings again if prompted.
If you want to change the system Frame rate while you are in battle, you can follow the steps below:
- Step 1: Within a game match, you press “+” button
- Step 2: Then you press “-” button to enter SETTING
- Step 3: Scroll to System Settings and change “Frame Rate” to High.
- Step 4: Press “B” to go back
As a result, the FPS can dip when played undocked with the High setting on. Playing with a high FPS means your device will need more power to sustain the game speed. This will certainly have an impact on your device’s battery life as you play the game.
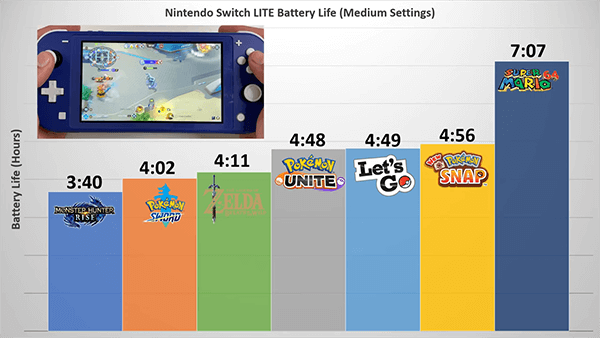
Battery Life While Playing Pokémon Unite in Handheld Mode
At Low or Medium system frame rate setting, you can get about around 5.5 hours battery life playing Pokémon Unite on Switch and around 4.5 hours battery life on Switch Lite.
Here is how Pokémon Unite compares to other titles on the Nintendo Switch Lite. Pokémon unite is almost identical to Pokémon: Let’s Go. I guess the visual graphic (screen resolution) of both games are quite similar.
0 comments